
Introduction:
Draw Anime Boy’s Hair: Anime is known for its unmistakable imaginative style, and one of the most notorious highlights of anime characters is its special and frequently elaborate hairdos. Anime Boys’s hair can go from spiky and dynamic to smooth and rich. Assuming you’re a hopeful craftsman hoping to become amazing at drawing anime Boys’ hair, you’re perfectly positioned. This bit-by-bit guide will walk you through the most common way of making eye-getting and dynamic anime haircuts that will rejuvenate your characters.
Also, please check out our cute Turkey coloring pages.
Stage 1: Assemble Your Materials
Before you begin drawing, ensure you have every one of the vital materials. You’ll require:
Drawing Paper: Pick a top-notch paper dealing with various kinds of pencils and inks.
Pencils: Have a scope of pencils with various lead hardness (e.g., 2H, HB, 2B) for drawing and concealing.
Eraser: A massaged eraser functions admirably for sensitive regions and forestalls smirching.
Barely recognizable difference Pens: These are perfect for inking and adding exact subtleties.
Markers or Hued Pencils: to add tone to your work of art.
Stage 2: Understanding Fundamental Hair Construction
Before you plunge into drawing elaborate haircuts, understanding the essential construction of hair is significant. Hair can be rearranged into three principal parts:
Roots: The hair begins at the scalp, thickest and most obscure.
Midriff: The hair, bit by bit, becomes lighter as it gets away from the scalp.
Tips: The hair’s finishes are the lightest and can have different surfaces.
Stage 3: Drawing the Head
Start by drawing a harsh layout of the head. You can make a straightforward circle for the skull and a bent line beneath it for the facial structure. This will act as the establishment for your personality’s face and hair.
Stage 4: Picking a Hairdo
Before specifying the hair, settle on the hairdo you need for your anime kid character. Peruse anime references or concoct your exceptional plan. Remember the character and attributes of your personality, as hairdos can frequently mirror these viewpoints.
Stage 5: Impeding In the Hair
Utilizing light and free lines block the haircut’s general state. Center around the general stream and course of the hair. Is it spiky, wavy, straight, or chaotic? This step is tied in with catching the quintessence of the haircut without becoming involved with subtleties.
Stage 6: Adding Volume and Surface
Begin refining the hair by adding volume and surface. Envision the hair as individual strands instead of a strong mass. Utilize light, fluffy strokes to make the presence of strands and the course they’re streaming in. Focus on the roots, midriff, and tips of the hair, and add layers where vital.
Stage 7: Itemizing and Inking
Whenever you’re happy with the essential construction, now is the ideal time to add subtleties and ink your drawing. Utilize a scarcely discernible difference pen to frame the hair strands and significant elements painstakingly. Accentuate the strands that fall in front and cast shadows on others. This differentiation between light and shadow adds profundity to the hair.
Stage 8: Concealing for Aspect
Concealing is fundamental for giving your drawing profundity and aspect. Distinguish the light source in your craftsmanship and shade the strands’ contrary side as needed. This will make the hair look more three-layered. Continuously develop the concealing utilizing different pencil grades, shining on making smooth advances among light and dim regions.
Stage 9: Refining the Face
While the focal point of this guide is on hair, the person’s face is fundamental to supplementing the haircut. Add facial highlights that match the person’s character, like eyes, nose, and mouth. Guarantee that the hairdo and face work amicably to make a fair and enamoring character plan.
Stage 10: Adding Variety
If you’re utilizing markers or hued pencils, here you can add tone to your work of art. Think about the variety range that best suits your personality and the mindset of the drawing. Use tone decisively to improve the general effect of your outline.
Stage 11: Last Contacts
Make a stride back and assess your drawing. Are there any areas that need refinement or changes? Ensure the lines are perfect and the concealing is steady. Add any last subtleties that will improve the general nature of your work of art.
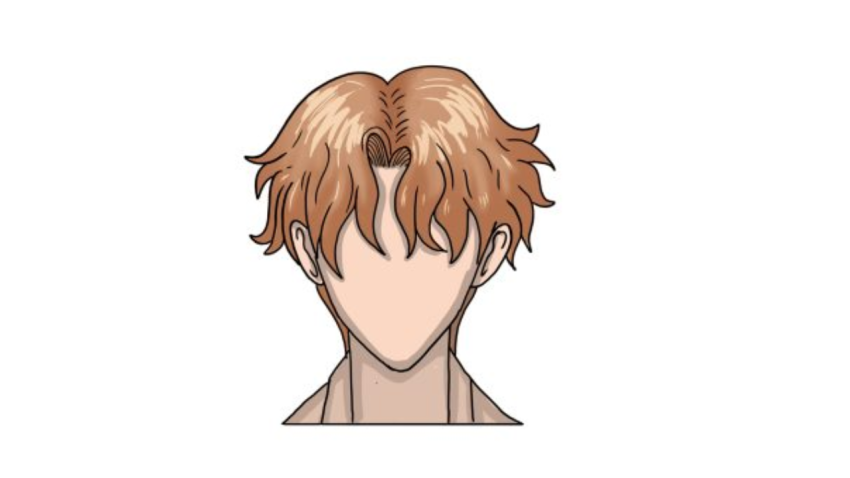
Your Anime Boys Hair Drawing is Finished!
That finishes with this aide on the most proficient method to draw anime Boys’ hair! We trust that you partook in the aide and that it showed you how fun and simple it tends to be to draw this character style.
The aide is intended to be a getting-going point you can utilize; you have all you want to make your characters. You could likewise take what you have realized and use it to assist you with drawing any of your number one anime characters. There are various styles of hair and characters that you could reproduce, so make certain to allow your creative mind to roam free! If you want more motivation, look at other existing characters in this style.
You could likewise utilize the hairdos of most loved entertainers, individuals you know by and by, or even yourself to display your personality later. When you have its hang, you might plan entire scenes with numerous characters interfacing with each other. We can hardly stand by to see how you decide to manage this drawing! You can share your image on our Pinterest page to flaunt your work of art. Assuming that you chose to name your personality, we truly believe that you will compose the name underneath the face so we can see what they’re named!
Conclusion:
Drawing anime Boys’ hair requires practice, persistence, and a sharp comprehension of hair structure and creative procedures. Following this bit-by-bit guide, you can make dazzling and enamoring anime hairdos that rejuvenate your characters. Recall that every artisan fosters their remarkable style over the long haul, so feel free to try and add your energy to your drawings. With commitment and assurance, you’ll be well-headed to excel at drawing anime Boys’ hair. For more information, please Click Here!